Pinhole Cameras

What is Photography at its Most Basic Level? - the Pinhole Camera
Pinhole Cameras make great educational projects for children but, they can be a lot of fun for adults too.
For children, Pinhole Cameras can be used as hands-on educational tools for lessons on light, chemistry and art. the constructing and using of a Pinhole Camera teaches patience, manual dexterity and creative problem solving/planning.
For adults, Pinhole Cameras offer a creative element that would be difficult to recreate digitally.
Pinhole Cameras are fun but, they're not just toys. I took four years of serious photography classes and my very first lesson learned was how to make and use a Pinhole Camera.
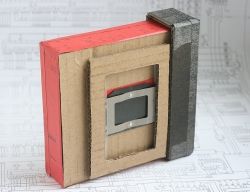
Image credit: Cardboard 9x12 Pinhole Camera
If you came here looking for digital pinhole cameras, try Hidden Spy Camera.
The finished Pinhole Camera takes real photos with color or black and white 35mm film (film not included). Ages 6 and up.
Small Aperture and Long Focal Length:
The pinhole-size aperture (the hole that the light passes through) and long focal depth (distance between the pinhole and the film) can be used to create a large depth of field (the range that is in focus). This explains why photographs taken with Pinhole Cameras can have items in the foreground and background both in focus on the same picture even though they're very far apart - try doing that with your digital point-and-shoot.
Long Exposure Times:
The small aperture doesn't let much light through so longer exposure times are necessary - often as long as five or ten seconds to expose film under low-light conditions and 10 to 15 minutes to expose photographic paper. This long exposure time results in movement streaks and intense color saturation.
Unpredictability:
The unpredictability factor is the "artsiest" part of Pinhole Photography. A ragged edge around the pinhole or film frame can create strange and uneven black borders around your subject. Over-exposures and under-exposures can sometimes yield unexpected surprises. Light leaks leave mysterious foggings and halos.

Making a Pinhole Camera
The easiest way to make a Pinhole Camera, and the way that will produce the most professional looking results, is to drill a hole in the body cap of your SLR camera. Most SLR (single lens reflex) cameras use interchangeable lenses. A camera body cap covers the opening in the camera body when no lens is attached - it keeps dust out and protects the inside of the camera.
- Mark two intersecting lines on your camera body cap. The lines should be drawn at the diameter (widest point) of the cap in order to have a centered hole.
- Drill a hole where the lines cross. Drill slowly and use the smallest bit that you have in order to produce that distinctive Pinhole Camera look; you can always make a bigger hole later if you choose. Smooth the edges of the hole with very fine sandpaper or burnish with a toothpick.
- Install the cap over the lens hole.
This only works if you use a black, light-tight cap. If you use an opaque cap or one that doesn't fit snugly, you'll fog your film.
Unique Pinhole Camera Photographs
Some features unique to Pinhole Photographs are:
Use a rounded box (like an oatmeal box) instead of a square box to create photos like these:
Manufactured cameras have a film frame which shields a portion of the film from light - a square frame exposes a square image. What would happen if your Pinhole Camera didn't have a film frame? You might get panoramic pictures like these:
Buy a Predrilled Pinhole Camera Body Cap


Or Make Your Own and Save $30

When using a handmade Pinhole Camera, it's often necessary to
Bracket Your Exposures -
If you think that the correct exposure time is four seconds, take one picture with a three second exposure time, one with a four and one with a five. Serious Pinhole Photographers might use seven or more different exposure times to capture one perfect image.